|
|
Do
you have a pro-morality message to add to this teaching work?
Please make your recording and send it to:
letters "at" celibacy.info
We prefer wav
files but will also use an MP3 if it sounds good.
If your file is too big, let us know
in your email and we
will send you an upload link using ShareFile. Short messages of
1-3 minutes are best.
Writing a Text First and
Running it By Me
I prefer
this. We can get better content that way. Before
making your audio write a text of what you want to say. Send
that text to the email address above. It is
likely that some revisions or additions will be suggested.
Many
of our audios or videos are jointly written Brotherhood
texts, and they are some of the best.
Audio
Tips for The Brotherhood
Julian
Lee
Two Important Basics
--
External mics different from a computer's built-in mic sound better.
--
Being no more than one
foot
from
the mic, and possibly as close as 6
inches, gets the best sound if you can learn how to avoid
distortion and spikes from pops. You
deal with these problems by 1) setting microphone
INPUT LEVEL
just so, and 2) creating a pop screen. (Placing some fabric over your
mic.) This is basically how the pros do it
and we can do it our lo-tech way. More about all this below.
If you have audio software like Pro Tools,
Sonar, Ableton, etc. and know how to use it -- so much the better.
Audacity
is a free audio recording software to
use and lets you
make wav files. That link takes you to where you can get it. Here is
how to start using Audacity. Follow these steps.
1
Download
Audacity here and install it.
2
Have an external mic
plugged in, or a decent
headset with mic plugged in.
Plug
in a headset-with-mic or just a mic. If using a microphone you
will have to mute the speakers of your laptop or computer so that the
sound generated from the speakers does not get picked up by the
microphone. Audacity is good at connecting to whatever input device you
are using with your computer. The built-in microphone to your laptop is
usually going to sound pretty poorly.
In
recording quality, microphone quality is the number one thing.
Generally you get what you pay for. I am going to talk about using an
external 1/8th-inch microphone plugged into your computer,
or a headset.
Later I will
show you a
3rd high-quality option: Using a handheld recorder with the
same external mic -- getting away from the
computer
completely during the recording.
Recording
with a corded external mic-with-cord, or
a headset
External mic with cord
Of the two options, a good external mic is best. They are better than
the mics built into headsets. Some of them are
excellent condenser mics! They do continue to
improve
headset microphones.
You can often find decent and cheap
external mics at Radio Shack or the electronics sections at
many
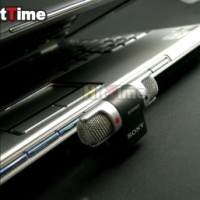
stores. A very good one by Sony is shown below. Try to get one
that can employ a cord
that
will let you get
some
distance away from your computer and its fans. The
cordless
ones can be plugged directly into your laptop (see 2nd picture) though
this might possibly be noisy. Below is a great-sounding
external mic I have used, the Sony ECM-DS70P. It can easily be bought
online. The third photo shows a 3-foot extension cord that can
come with
it , though longer ones can be found. An extension
cord to
get the mic away from the computer when recording is the
ideal
approach.

 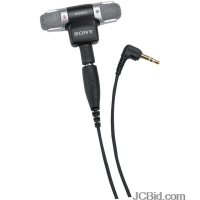
This is a "condenser mic." Condenser
mics
are, for the most part,
what you want. There are other similar mics similar to this
that
also sound good. This Sony can easily be purchased online for
$25-$75.
The advantage of using the cord is getting away from your computer and
its fans. Later I will give you some good ideas for doing this and
killing all fan noise. The
middle
strategy (into the side of the laptop)
might be noisy or it might not. It will depend on
how loud your fan is
and where it's located on your laptop. I recently made a test audio
using this method that sounded pretty good.
Use
headphones to monitor
Having your external mic you can do the recording without
having
also headphones, but it is better to be able to monitor
yourself
as you speak. So use whatever headphones you have along with your nice
external mic.
Adjust your
computer's "audio properties"
Right-click speaker
icon > Audio Properties > Audio
By right-clicking on your speaker icon you can "Adjust Audio
Properties." Choose the "Audio" tab. This lets you be sure that your
computer has the correct mic and headphones selected. I also
recommend that you click "Volume" under the microphone (in XP) and max
it out, or at least put it up around 80 percent. This is
where a
healthy microphone input level begins -- in Audio Properties. Later you
will also adjust the input level in the Audacity program. But you don't
want to be starting with your mic set too low inside the computer
itself.
Headsets
with microphones
Another option already mentioned is a headset with a microphone. This
can give great results if you have the right headset. Some of
them
have a bad trait of
being "noise canceling." This means that they act like compressor
limiters and give a on/off effect. That is, dead silence,
then
sudden sound and it's all at the same level as if compressed.
This feature also causes words to be cut off at beginning and
end. It is designed for workers in phone centers to cancel
out
the background noise between words, plus make their voices loud. But
it's bad for audio making and will give unnatural results. We would
rather have whatever noise is there and work on it in our own
way. Thus a headset can work -- whether USB or 1/8th inch
plug --
but they are not all alike and only a few will
sound really
good. I have a headset by LOGICTECH that sounds pretty natural, a USB
version. The mic is off to the side put picks up well. (I don't usually
make audios with it.) It is likely that the microphones in headsets
will keep improving. and the audios by Shaswata prove that we
can get decent audio from them.
Later down the page I am going to tell about the 3rd and best option:
Recording to a small digital handheld using the same external mic. But
let's keep moving...
3
Click the
record button.
Click on the red record button.
Audacity immediately creates a stereo track with a cursor running.
(Looks like two tracks.)
Speak some words or make some sounds and you will see them
show up in the waveform being created on the track as spikes and
shapes, like this:

The kind of waveform you
typically get when first recording with Audacity's default input level
before increasing it. This is a weak input level.
This is a pretty weak waveform (quiet, not
much sound) that comes using Audacity's initial default setting where
the microphone input is set in the middle, at half. You don't
want
this.
4
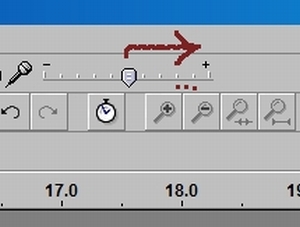
Slide that
input level up, while talking!
At
upper right of the program is a microphone icon. To the right of
that is
a slider. This is the Input Level. This is the most important
thing to take command of in recording, including in Audacity.
Where you put it depends on how hot your mic is by nature,
and
where you are relative to your mic. This is where you set the perfect
level. Sometimes the default half-way point is too low. So while
recording and talking slide this up or down,
watching
the waveform that you are getting.
As you slide
it to the right a weak waveform will get
healthier -- fat and shapely, like this:

A good input level in a noisy room.
This
is the sort of waveform that you want (and we want). A healthy
waveform fills much of the track WITHOUT
touching the top or bottom. In most audio programs if
the waveform touches the far edges of the track that
represents
distortion. Note: This was done on a headset in a noisy room. You can
see the noise floor in the form of the dirty thin connecting
lines. Now,
a weak waveform with the input level too low looks like a
thin strand of hair with a few little
crumbs on it:

Or even less visible sound that that! Sometimes it's so weak you can't
see anything there at all. Don't make one of these! They
sound bad. They have little
tone. After we crank it up using compression etc. a noise floor will
become evident. There, now you know that it works and that you
can definitely make an audio with Audacity. A healthy
waveform
with a strong level and in a quiet room looks like
this:
Good levels


Healthy input
levels in a quiet room. These are the kinds of waveforms you
want.
Notice
that the quiet parts feature a pretty clean straight line without much
junk on it. This means it was a pretty quiet room without a lot of
computer fans running or other noise sources. And that means the spoken
sound can be beefed up or brought up to a good level without having a
lot of noise increasing along with it. Now let's get really
serious before you really make your Audio and get a fairly quiet room!
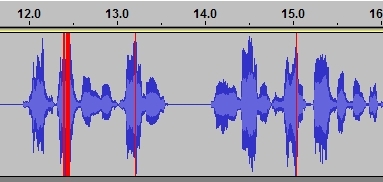
Notice
the
thin lines stretching up and down in the lower two samples.
Theses
are the waveforms for the "Oops! Male Period" audio made with a very
good Neumann condenser mic plugged into a Tascam digital handheld. The
3rd is a blowup of the 2nd. These are pops
from plosives because I didn't have a sock (pop screen) over
it. I
was about 6-8 inches from the mic for these. The proximity
is why
the waveforms are nice and fat -- good bass frequencies are present.
5
Kill unnecessary room noise
Why make a great audio that has lots of noise in it? A common
problem with audios when starting out is lots of room noise in
the background. If the spoken audio is also weak, this is a big problem
because as we raise the level of the spoken part, the noise
gets
raised also. The first part of the solution is to turn off every
unnecessary sound. To see
your noise
floor visually put the slider up just 2 notches
short of full and press
record. Just be perfectly quiet and look at the red level still
bouncing around. That's your ambient room noise and
noise floor that
you are dealing with. Amazing, huh? You want to reduce that
activity of
the VU
meter as much as possible by killing sounds in the room. As you do the
following things you can watch that noise floor diminish:
-- If the window is open and traffic noise is coming
in, shut the window.
-- Turn off the refrigerator. A refrigerator makes
lots of noise in the background when it cycles on.
-- Turn off
unnecessary
fans or machines.
-- Do the audio when nobody is around making extra noise like
walking around or working in the kitchen.
-- Do it at night if possible.
-- Turn off unnecessary peripherals to your computer such
as external drives or printers.
Sometimes even after all these steps
the fans of your computer still show up in the audio and they come out
as noise in the audio. You'd be surprised how a couple of computer fans
ends up sounding like the neighbor trimming his hedge with an electric
trimmer after we try to raise your speech level. Then when we try to
reduce these chronic whirs, chirps, and
buzzes with EQ -- it can end up robbing your voice of good
frequencies and clarity.
An
Advanced Trick For
the Avid
Audio-Maker: Create a makeshift sound booth
Once
I was being interviewed for a radio show.
I was
to use my headset and talk to the interviewer via Skype. The
engineer stated that I sounded noisy to him; that I was in a noisy
room. It was just a living room with hardwood floors and not much
furniture. I knew that he was hearing the "room" which was a
particular reverb. Always wanting the best audio quality for our
message, I built a makeshift sound booth around myself there in
my chair to trap my voice inside and divide myself from the
room
noise. I used two folding room dividers as the structure. (You have
often seen one of them in various photographs, a carved Indian hardwood
divider that folds into four planes.) So I had a little square
structure around me going about 3 feet above my head, open on one end
where I could see my computer screen and type. From the top of the room
dividers I draped some blankets, putting long folds running down so
that they looked like theater curtains. Each long fold,
like long
mountain ranges and valleys, helped trap sound. You can use large
paper clips, paper clasps, or even staples to keep the fold structures
in
place.
Next time I chatted with the sound man he said that I sounded
a
lot better and he could not hear the room sound any
more,
and that's how I did the radio show. If you are serious about
getting a good sound, try creative things like this. If your
father has a large box in storage that some appliance came in, that
could be an ideal start for a little sound studio. Aside from blankets
with long folds, there are foam cushions designed for beds
that
have mottled patterns of up and down ridges. These can be
good to
hang on your "studio" walls also. I remember on the old comedy show
"Hee Haw" they would show a small town radio announce. On the
walls of his studio he had many eggshell cartons --
with
their up- and down- formations -- as sound-deadening material. The
truth is, egg cartons do work to trap sound. I think I might
make
a little makeshift sound studio with egg carton walls to show to my
brothers some time!
1  2
2  3
3  4 4 
1. Room dividers like the ones I used. Maybe your folks have
something like this around?
2. A big box that an appliance came in, or even standing slats
of wood -- can help make
a clean-sounding sound booth. Better to find
something tall you can set a chair in or even stand in
comfortably.
5  |
3. This foam is
designed to deaden rooms for recording
spaces.
You can often find bed liners at the grocery store that are
shaped similarly, and you can drape one or more of
these
across the walls of your makeshift sound booth. The pricier
stuff
designed for acoustical work has deeper fissures.
4. Egg cartons applied to the walls with glue or a staple
gun. They help!
5. Curtain folds do a lot to trap and kill reverberant sound.
You
can use a sheet, blanket, towel, etc. The deeper the folds the better.
You can use large paper clips or metal document binders to clip the
outer ridges to keep the form basically stable. Curtains have been
recommended as a low-tech sound deadening solution by audio pros and
they work.
As mentioned: Sitting on the floor inside of a
closet filled
with hanging clothes will accomplish much of
the same thing.
You can do this using a mic extension, or with the laptop inside with
you, mic stuck into the laptop. The closet environment will
still
deaden much sound including fan noise.
|
6
Get the best mic distance
The mistake most guys make in recording is being too far from the mic.
Having the right distance plus the right input level gets the best
quality of your voice, creates nice waveforms, PLUS ends the
room-noise problem!
Be as close
as possible to the microphone
The most basic solution to room noise --
once you have everything possible turned off -- is
to stay close to
the microphone. If the mic can only "hear" you it misses the room
noise. Proximity forces you to reduce the mic input level
to avoid
distortion. But that's fine because the system doesn't need
to hear
anything but your voice -- that's all we want to hear. It's
like
if somebody whispers in the ear of somebody a bit hard of hearing --
they hear it well though they can't hear much else. In the
same
way when you are close to the mic it hears you well, even though it's
input level is low, yet it hears less of the things
beyond
you. You want to make your microphone a little "hard of hearing" so you
can get close to it, yet at the same time you want to create big, fat,
full-sounding wave forms that use up most of the dynamic range on your
level meter.
If you are too far from the the mic there are two things that can
happen: 1) Your voice sounds weak with most bass tone missing, and 2)
You crank it up to get your voice louder -- but now the microphone
"hears" the room and all the noise in it. "Room sound" is a bummer
because it's hard to get rid of it, in processing. If we try to use
various reverbs this natural reverb already there -- the sound
of the
room -- may mix badly with our reverbs and make it difficult to try
different things with your audio.
Again, the solution is
simple: Get close enough so that your voice is big and bold for the mic
and you are producing big, fat waveforms but the input level is thus
lowered and the mic can't "hear" past your voice or hear the room. The input level is only
enough to get your voice fully.
Generally speaking, more than 12 inches from most mics is too far away.
Unless
you do very loud deliveries or are doing an audio where you want a
loud, dynamic delivery. For most audios you should start 12-6 inches
from the mic. This is going to let the mic really "hear" your
voice
and all your bass tone, and get "proximity effect" which is a nice fat
sound. Watching your meter will help you figure out
the
perfect distance. Now immediately you will probably noticing a "pop"
problem. This has all been seen before...
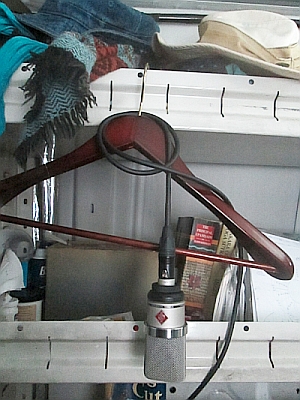
7
Improvise a
Pop Filter to get close to your mic
As
we get closer to our mics the plosives start to hit the mic and make
distortion spikes. (You'll get red marks on your
Audacity
waveform.) These are worst with the "p" sound. Professionals
place a screen in front of the mic -- they used to be little
circular
shapes stretched over with nylon fabric -- to kill these air-pops so
they don't hit the mic. You can do the same by putting one or even two
socks over your microphone. Really! You'll be able to get closer to
your mic and sound better. Some of my audios had socks or
fabric
over
the microphone! Try a fluffy, porous wool sock. Experiment.
8
Observe
the red lines appearing on the waveform, use that guidance to
set your input level.
When distortion occurs from a too-hot input level, a
sensitive mic, a too-loud
sound, or too much proximity to the mic -- Audacity immediately places
a red line into the waveform. It places it there
as it is forming to show that
distortion occurred there. When you get a few of these, these,
reduce the slider
by a notch or two until no red lines form on your loudest
words.
This
is an example of a good, healthy waveform but having distortion spikes.
(Oops. I've made a lot of these!) Notice how some of the peaks reach
right out close to the edges of the track. The input level
needed to
be down a bit, perhaps just one notch or so.
9
Activate and
learn to
watch the dynamic input level meter, setting your level with this PLUS
the 'red lines" guidance -- before you try making the audio.
In the top middle of the program are two double-gray bands. The one on
the left is the speaker level and is not worth much. The one on the
right
is your input level, usually the critical visual item in recording.
Click once on it while you are running record (recording) and it will
come alive and start moving, with red color bouncing off to the right.
Now you have a moving "VU meter."
Most sound engineers watch the input level meter like a hawk
while recording somebody to keep good levels
just short of distortion. So audacity has one of
these
dynamic input level meters to help you watch your levels as
you speak.
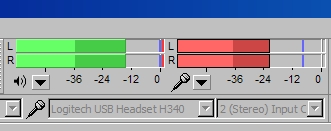
Audacity uses red and darker red. This is a confusing
feature because red is used to denote distortion in most audio
software, but neither of these reds denotes distortion.
So
don't let it fool you. The little blue line to the
right
shows how far the red
COULD go before distorting. So both reds should be
filling 80
or more of the meter length. This input level shown is still
too
low!
When you first hit record and Audacity makes its
running track and your waveforms, this input level meter will be dead.
You activate it by clicking on it once. Again, the green part is
useless and you need do nothing with it. This
input
level meter still has value and you should learn to keep your eye on it
when setting your levels. By both watching this moving input meter plus
watching
when a permanent red line gets placed into your waveform
(track)
- - it will be easy to set the right levels for maximum sound while
avoiding distortion. (We don't want distortion.) Watching this while
you speak will give you feel for how loud you can speak before
distorting, and how close you need to be to the mic.
10
Finally really getting away from
the computer and fan
The reason to use a cord with your mic is so you can get a few feet
away from the laptop after setting levels
and pressing record. Now we are
going to get really high-fidelity and into the studio-quality range
with a few low-tech tips!
In the scenario shown where the mic is
plugged right
into the side of the laptop, it's possible the mic will pick up
noticeable
fan noise.
I
did a test where mic was plugged into the side of my laptop,
the
fan noise was not too bad. But different mics and laptops
will
produce different fan-noise results. You have a cord to help
you
get a bit away from the computer,
but it may be rather short. Meanwhile there may be other sounds in the
room or ambient noise and room sound.
Record
sitting on the floor in a closet
A great concept is to go into a
closet full of hanging clothes and sit on the floor
with
your laptop right outside of the closet on the floor. This
is a very dead space with almost no reverberation. The cord can be
going out the door crack (or under the door) to your laptop sitting
right next to the door. You could even have the door open a
crack
so as to see your screen and your levels as you
speak, and
still preserve most of the "dead" quiet!
A deader
part of the house, such as a carpeted corner with furnishings
Or
if you have a particularly dead corner of a room, maybe with
lots
of chairs and furniture there. Clap your hands in different places to
see how much reverberation you hear. You could sit in a plush chair
with your
mic/cord with your laptop down on the floor to your
right
on a carpet, which soaks up its fan noise.
Sitting in
the middle of a sofa in a carpeted room
This could be a very dead sounding place, and you
could
have the laptop sitting beside you off a ways, thus the 3 ft.
cord might be enough.
Use your imagination with your situation. Remember
clapping
your hands shows you how much 'ring' the space has.
11
Click
on Record and Make Your Audio, creating as many takes and restarts as
you need without stopping the initial record -- Keep Talking Till
You're Done, Flaws and All!
Now
you have levels set. Click record and go into your quiet
spot,
and start teaching. Ideally by reading from a piece of
paper. Don't worry about the time it takes to get there, or the noise
as you are sitting down in your spot, or if there is 2
minutes of
noise at the start. You will be chopping all that off in editing
afterwards.
Let's say you flub some words, or pause too long.
(Most of us do.) Don't get up or stop the recording. Nobody's
going to hear the flubs. While still recording simply begin sentences
again from a point before your error. Even if you have to say a
sentence or word 4 times, just keep recording and get it all there. You
might even like to try 2-3 different deliveries on a certain line, to
have some options to work with later. So just keep talking, letting all
your flubs stay, until you get through it.
After you have
gotten through it with as many sentence restarts as you like,
finally get up from your quiet spot and stop the recording.
Now
you can easily remove the flaws and create the perfect audio from the
good parts. To do this is easy. You're just going to delete
the
parts you don't like.
A pause for some notes about
Audacity
The two things of critical value about Audacity are that it 1) Lets you
create wav files (uncompressed), and 2) It has an input level slider
and a way to monitor for distortion. Audacity lets you set
your
microphone input level (slider to
the far upper
right marked by a microphone icon.) I am not an expert with Audacity
and I find 2 annoying features to it. The first annoyance is
that
every time you push "record" Audacity creates a new track. This even
though you just wanted to pick up recording from where you left off on
the same track. In Pro Tools, if you set the cursor on any track,
recording begins from that point on that track. But Audacity is always
creating new tracks that you don't want. If anybody can tell me
(Julian) ways around these, I would love to hear
them. The way to deal with this, if you are making an audio
and
need to stop, is to set the cursor right at the end
of the
last track at waveform's end, then click record
again. A
new track will be created, but at least it will be starting
from
the last time point where you left off, and not at
the beginning. So you end up, as you
pause and restart, with a bunch of tracks that are all staggered in
time. It's weird, but later you can copy/paste all these waveform
pieces onto the one original track and get rid of the extra
tracks. 2) The second issue is that as you desire to patch
together
different takes across all the various tracks it creates, it
seems
like a complicated process in Audacity. You can't
just drag sections
onto tracks with a "hand" tool as with ProTools. But you can
patch
together your various takes (if you wish to get that clever
with it)
using copy, paste, and other controls. With practice you can indeed
produce great sounding audios with Audacity plus learn
to edit them, patching together your best bits and
takes.
11
Edit your
track: Get rid of the bad parts of your audio and use the best
Basically now you just cut out the stuff you don't want, like
flubbed words or takes you don't like. Set the cursor at
a
place where you want to make a cut:
Go to Edit
> Clip Boundaries > Split.
Or use Control - i
It will make a break there. Now make another split point so there are
two splits. (Basically make a split to either side of the part you want
to remove.) Now delete the section you don't want by
selecting the bad part with one click and hitting delete. The
waveform automatically closes up where you deleted a piece.
The
bad part is gone. You can't even tell there was an error there.
I don't like the way Audacity edits compared to Pro Tools, but you can
produce a great audio with it just the same, with all imperfections
removed. If you don't want to mess with editing right now you can
simply send us the
Audacity job -- with your flubs on it -- and we will put it all
together and get rid of your errors.
12
Export the
spoken part as a .wav file and send it to us
Don't
do any sound processing on the audio. Export the talk-only part as a
wav file and send it to us.
How to Send
Files To Us
1) Send the
.wav or .mp3 file as an email attachment or to requested
upload link
If all you can do right now is just talk to your computer,
just
send whatever file gets produced. We prefer getting uncompressed files
(wav files) but if you ended up for some reason with an MP3,
still send it.
2)
Send the whole Audacity job
If you have started working in Audacity, we would like to get the whole
Audacity job wholesale. At some point you did "Save Project As" and
created an Audacity file with the extension .uap.
Before doing any work, create a folder with a name and save the .uap
job file in there. Then send us that folder to ShareFile. You
will need to request this in your email to letters@celibacy.info.
3)
Export the Audacity job into a wav file and send us that
You can also "Export" your Audacity job into a .wav file and just
send us that. Go to File>Export and choose .wav
from the extension type popup menu. If your audio is short
you
may be able to send that wav in an email or via Skype. Otherwise, you
will need to request an upload link even for this wav. You
would
do this if you were a control freak and didn't want
us to
be able to do much with your audio should we want to improve
it
in audio terms. (We still might change it anyway!)
4)
Send your .wav file produced by Pro Tools or other software.
More Advanced Tips
Keep spoken
tracks separate from music tracks for control and quality
The crude way to add music to your audio -- and may beginners do it --
is to have music playing in the room, perhaps from a stereo or the
computer itself, which is then picked up by your microphone along with
your voice. The problem with this is that if the music is too loud --
or too quiet -- there is nothing that can
be done
about it later. Also the music is going to sound very second hand,
affected by your mic quality and whatever room noise or room sound is
there with it. None of this can be remedied later when we try
to
spruce up the sound. What you want to do is to have
a
separate track for the music. This will give you a better quality
music track, plus complete control over how your
voice and
the music interact. I will recommend several approaches,
from the
best to the worst.
Get the MP3
or wav for that music and import it onto a 2nd track
There are many ways you can get clean audio files for music. If you
have the CD, free file conversion programs like Switch Sound File Converter
easily let you take a song off of a CD and convert it to a
.wav
file. Place the new .wav file into the same folder as the
whole
job (always a good practice -- keep all used files in one
folder), then use File>Import>Audio
to bring it into the Audacity job. A new track will automatically be
created. You can also, of course, grab an audio track from a YouTube
video in the form of an MP3 or wav, or maybe you have some MP3s here or
there. In the same manner, you simply import one of these into the
Audacity job as a new track. There will be no audio downgrade or room
sound from using a mic and you'll have total control over the music.
You can then use the "Envelope Tool" to make the music softer
or
louder in places. This tool is the icon that looks like two pyramids
with a blue line between them, in Audacity's set of 6 click-to-use
tools. After clicking the icon, wherever you click on your music track
a dot-point is created. You can then drag the dot up or down.
When you drag it down to the middle, volume is being automated
downward. When you drag it to the edge of the track, volume is being
dragged up. Big blue lines from across your music track to
show
you your volume automation visually. It's kind of clever.
You can do the same with your speech track if you
need to.
The following graphic shows a stereo music track (below) that has been
volume-automated using the Envelope Tool:
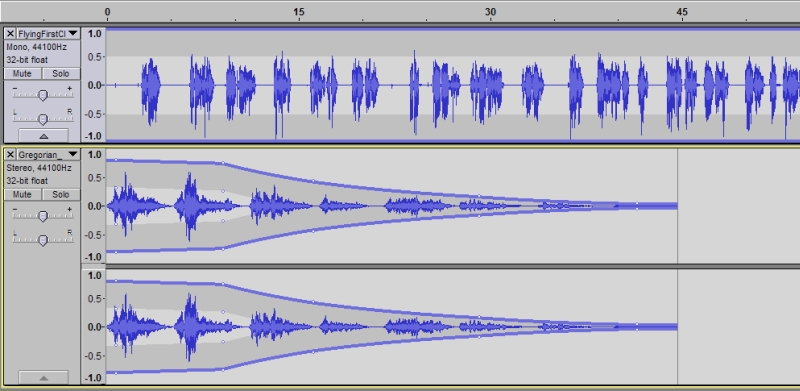
At top is the spoken track. Beneath is a music
track, a Gregorian Chant MP3 that was imported in. Because it
was
in stereo Audacity shows it as two identical tracks. Where you see the
tiny white dots, that's where I clicked after activating the
"Envelope Tool," creating drag points. Then I could drag up or down and
the blue lines were formed, showing volume automation. The Gregorian
Chant starts out loud, as intro music, then fades
to nothingness.
It's very easy to automate volume in Audacity
using the Envelope Tool and clicking on the track to set points, then
dragging the white dots up or down. Thus you won't have the
music
too loud or too soft in places. You can also use EQ on the
music
and speech tracks for more advanced improvements. (Won't
go into
that here.)
Improvement to lo-tech
music adding: Do speech and music separately, using the mic, and
creating two tracks
Now, let's
say you can't figure out how to get a clean music MP3 or wav from your
CD collection or off the internet right now. All you can
figure
out to do is play it in the background while you talk to your
mic. Still, don't play the music when you talk. We would much prefer a
dry spoken track. So record the spoken part dry and add the
music
later in the same low-tech way:
After
you have created your spoken part record again just
your music
in the same way, playing it to the microphone. Be
very
quiet and don't speak or squeak your chair.
Audacity will
create a 2nd track as usual, then you will have the music
separate from the spoken -- even though it probably sounds crappy
because recorded by a cheap mic and picking up room sound. But even
this is superior because you will have a clean speech track
and
you'll still be able to automate the volume on your music
track,
use EQ, etc. It will still give you a lot of control over your audio.
Later you can find out how to grab original MP3 or
wav
files, import them in, and quit mic'ing the music. For now, just do a
separate mic'ing run for the music and have it on its own track.
You
can also make
your spoken audio, then simply send us a music file for it and let
us deal with it. You can even point to the song,
telling us
its name or sending us a link to it and we'll try to use it.
A Third and Better Way to Record:
A handheld digital recorder with external mic
This is the best option because these battery-run recorders
have
no fans and make no noise. You can take it into a
quiet,
dead space anywhere you can find it. If you hold the device very
carefully without moving your hand, or place it somewhere steady, there
will be no noise created by touching the device. You can also plug
your external mic directly into the device with no need of the cord
because it's all right there. After creating your files -- as
many as you need -- you can move them all into an
editing
program such as Audacity, or even better yet, Sony Vegas. This
requires, of course, buying a digital handheld which can range from $30
to $300 dollars. But I have used
this method a lot. One sticky issue is that the manufacturers make the
cheaper ones unable to make .wav files. You end up having to pay $75 or
more for those that make uncompressed files. I am not going
to detail this option here at the moment.
Julian Lee
Make Audios No Matter What
This
is how I recorded my last several audios, including the "Oops, You Did
It Again" above.
The best microphones use a 3-pin connector and I picked up a Tascam
handheld recorder that receives those plugs.
(Not shown.) For the "Oops" I was about 8 inches from the mic, and a
light reverb was added that I call the "Shaswata" reverb
(came up with it for applying reverb to one of his audios).
This is the cheapest available Neumann microphone,
which is the German microphone company that makes famously high-quality
microphones
considered by many to be the best in the world.
You don't need a mic like this to sound great. The point of the illustration is that Brothers who are rangers
should learn to keep on making teaching audios steadily from the Level 2 state with the
best possible quality in whatever way gets the job done.
|
|